My Blogland Followers

Sunday, September 11, 2011

Happy Trails

I made the following card last month, for my grandson before he went to his first sleep over camp. He was gone for most of the week and had a marvelous time. I wanted to keep the card simple and of course added some money that he could spend at the camp store. It just happened to be "International Left-Handers Day!" This is a holiday that most of us aren't aware of. However, Joey just happens to be left handed. Look carefully and you will notice that this card opens from left to right!! He didn't seem to notice until I pointed it out. We do live in a right-handed world!

The pocket on the right was used to hold the money.
Materials Used:
DP, CS, Stickers: Michael's
Baker's Twine
Sentiment: Computer Generated

This is such a simple card. Boys seem to like the simplicity. I hope that you enjoyed visiting my blog and that perhaps I have inspired you to create a Clean and Simple Card. Thanks for visiting. Please feel free to look around, leave a comment and/or follow this blog. Have a wonderful week.

I am sharing this card with:
paper sundaes: Finish the inside of a card
truly scrumptious challenges: Decorate the inside of the card
card makin mamas: Use Digital Images
crafty anns challenge blog: Make something outside your comfort zone
drunken stampers: Tell about what you did this summer

Sunday, September 4, 2011

Wedding Favor


I had so much fun crafting this elegant wedding favor! I was given the following to use this week from:      My Grafico
I chose the elegant bride on the bottom right to use on my wedding favor project.
I wanted to keep the silhouette look so I began by making the wedding favor triangular box from black and white DP. I added a verse from the Internet, backed it with silver paper then added hot pink flowers and a spray for the wedding department @ Michael's. The DP as well as the ribbons all are Michael's products. Of course, the Kisses made this favor complete!!

This is my second posting for the My Grafico Design Team. Don't forget that you still have a week to enter our Back to School challenge HERE.  I hope that you enjoyed visiting my blog and have had a chance to look around at some of my latest creations. Perhaps I have inspired you to make a new project, scrapbook layout or/and a card. Please feel free to leave a comment and/or follow this blog.

I am sharing this project with:
critter challenge blog: Anything But a Card
paper make up stamps: Pink, Gray, Black and White
die cut dreams: Gift Box or Gift Bag
addicted-to-stamps-challenge: Anything but a card
stamptacular sunday challenge: Think Outside the Box: Try something different
designed 2 delight: Wedding or anniversary
ellephantastic challenges: Here Comes The Girls


Monday, August 29, 2011

first day of school

I am so excited...I can finally announce my news... I have been selected as a Design Team Member on My Grafico!! This is a digital stamp company. We are encouraged to think "Out of the Box" when designing our projects. My first project is probably one that you have  not seen before unless you live in Germany. While working in Germany many years ago, I was curious about the darling cones that children carried with them to school on their first day. 

I wanted to share this tradition with all of you. So, if you have a few minutes read on...
In the history of mankind you can find many major inventions — such as the creation of the wheel and the light bulb — but there are also small ones like the Zuckertuete (literally translated, "sugar bag" or "candy bag"). This is a German tradition played out every September at the start of the school year. The First Day of School, Einschulung, is a very special event in Germany that symbolizes the importance of a child's formal education. The Zuckertuete — a special cone-shaped container that is about three feet tall filled with candy, toys and school supplies — is a gift from the parents to their children so they feel special on this important day. Literally...a sweet way to begin their formal education.

I understand that this cone (schultute) is given to children only once - when they enter first grade, the beginning of their formal education. It is only appropriate that I design one for my granddaughter who will be starting first grade in another week!


Here are some fun things to put in the bags: crayons, erasers, watches, yo-yos, hair clips, gum and stuffed toys. And as is the German tradition, fill the Zuckertuete up with some authentic German candies such as marzipan, chocolate kugelns (kisses), and gummies.
# I used a large black cardstock from the Dollar Tree to make the cone. The darling digital stamps are from My Grafico Crafts. The sentiment is computer generated and then cut with a Spellbinders Die. I distressed around the edges of the die with CTMH ink. I also added Stickles to the girl's skirt, her hair clips and the lights on the bus. I tried to show both sides of the cone so you could view more of the digi stamps. The ribbons as well as the fabric, at the top of the cone, was from Jo Ann Fabrics.

This was a difficult project to photograph because of all the 3Dimensionality! I hope that I have inspired you to perhaps create a Schultute for a special child entering first grade :) Maybe you will try to create something...out of the box for your next project!  I hope that you enjoyed visiting my blog. Please feel free to comment and/or follow this blog.

I am sharing this project with:
paper pretties : Back to School
stamps r us challenges: Anything Goes
crazy challenge:NEW School Year
catered crop: Ribbons, Stickles, Collage, Layering digital Stamps
sentimental sundays: Back to School
all sorts challenge: Back to School
just us girls challenge: Back to School 3D Challenge
just some lines blog: Anything But A Card
one stop craft challenge: Anything But Square


Thursday, August 18, 2011

Good - Bye Tonsils

You might just think I am a little crazy...What's a Nonnie to do when her only granddaughter has to have her tonsils out...Make a card for her...of course!! The tonsillectomy was today and "little one" is OK. Thanks Goodness. Her mom baked and decorated a "Good-bye" tonsil cake that we shared last weekend. Of course she received lots of little presents and good wishes along with popsicles and sherbet.
Her love of peace signs and bling inspired me to craft this card. Can you see the error??? The peace sign is upside-down!! I should have been more observant!


The paper pack was from Michael's so it made it easy to layer the DP. The sentiments were computer generated. This brought a smile to her face and if it helped ease her fears, I am glad.

Recipe:
DP, peace sign stickers, ribbon: Michael's

I hope that you enjoyed viewing this card and that I have inspired you to "think outside the box" when creating cards. Sometimes the most unusual and least expected cards are truly appreciated. This is why I love crafting cards. I have not seen too many Good-bye tonsil cards in the stores!! Please feel free to leave a comment and/or follow this blog. Have a wonderful weekend.

I am sharing this card with:
One Stitch at a Time: Anything Goes
ai factory challenges: anything Goes
craft us crazy: Anything Goes
paper-crafting journey: Anything Goes
shellys images blog: Anything Goes
stamp insanity: Anything Goes

Tuesday, August 16, 2011

Happy Birthday Sports Enthusiast

Well...my mojo is back!! Thank Goodness. I created three cards. All for the grandkids! This card is for a grandson who just loves sports...All Sports. What could be better than this stamp for a special card for him? I started with a sketch, which makes me comfortable. Then I choose the papers from a special sports package available at Michael's. Love all the sports related DP!  The Brads in the upper right each have an initial on them t g r (his initials.) Sorry, you cannot see this in the picture? I used some ribbon, also from Michael's behind the picture. Did you notice the green grass adjacent to the footballs?  I stamped the image on a tan DP then colored it with Prisma Pencils, blended it,accented with Gell Roll Pens and fussy cut it. I love the way it turned out!

.

The second picture shows the inside of this card


Recipe:
DP, brads, & ribbon: Michael's
Distressing ink: Tim Holtz
Rubber Stamp:  Darcie's Country stamp
Border: Fiskar's clear border stamps
Coloring: Prisma Pencils
Sketch: 2 Sister's Challenge/sketch 2

I am usually very critical of my work. However, I am so proud of this card!! I love the details that I was able to color using the Prisma Pencils and just how everything came together as I had hoped. I also was pleased that I could personalize this card with the initial brads. I hope that you enjoyed viewing my card. Perhaps I have inspired you to create a card for a boy/man. We all know that these are more difficult cards to design. Please feel free to leave a comment and/or follow this blog. Don't forget to visit again soon. I have three more projects to post this week. Have a wonderful week and please take the time to do something that makes you happy.

I am sharing my card with:
(T)anything challenge: Birthday/Celebrations
oldie but a goodie challenge: The Great Outdoors
shopping our stash: My weakest Link: DP!!
tuesday taggers : Anything Goes
use it tuesday: Indian Summer and use something forgotten: I have had the initial brads for quite awhile and was waiting for the perfect time to use them. These personalized this birthday card. When I think of Indian Summer, I think of the last hurray- outside before being inside all winter...a change to play any sport, even if it is only a few times before the cold weather and snow return:0)
bling it on challenges: A= arm band, B= Bear, C= card  ABC challenge
hobby stuggu: Card for a Man
cards for men: Anything Goes
diekreativenstempelfreunde: Design your own background
the angel company:  Recipe:  3 Brads, 2 Patterened Papers, 1 Ribbon
incy wincy designs/:  Recipe: 3 Embellishments, 2 Patterened Papers, 1 image


Riley on Vacation!!

I wall thrilled to learn that I had won a Riley stamp from Riley and Company for participating in their recent Blog Hop. I chose Zip-Line Riley. I have so many ideas and sentiments in mind for this adorable moose. You will have to return soon to see what I make. Perhaps I will inspire you!  If you don't want to miss anything, please follow my blog :) Have a wonderful day. Hugs

A BIG THANK YOU TO RILEY AND COMPANY ONLINE STORE. You can check out their wonderful stamps by clicking HERE.

Wednesday, August 10, 2011

cupcake

Here is a clean and simple card that we made at Stamp Class.
Sometimes it is fun to make a card that can actually be sent in the mail! The postmaster just smiles when he sees me now!! He is thrilled that I take the time to make so many people happy with my cards and of course..not said...I spend more money at the post office!!
All of the materials used for this card are from Close to My Heart.

I am entering this in the following challenges:
divas by design challenge: Birthday Celebrations
(T) anything challenge: Birthday Celebration
(T) tuesday throw down: Birthday Celebration
(M) incy wincy designs: Something old: Sentiment Stamp/ Something New: DP
(S) birthday sundaes : Must have Birthday Sentiment on Front of the card
(SAT) send a smile 4 kids challenge: Anything Goes...for a child
(F) card makin mamas: Birthday Cards

I hope that you have enjoyed this post. Creating a simple card is fun and so easy to send. Just choose fun colors. They really don't even have to match! This is a perfect sketch for a boy/man birthday card. Please feel free to leave me a coment and/or become a follower of this blog. I hope that I have inspired you to try a simple card or just case this card using simple, classic shapes. Thanks for visiting:)

Monday, August 8, 2011

Hand Made Crocheted flowers and Hat Pins

Since I have taken a leave from design teams, I have been dabbling in several creative outlets. I hope that your will enjoy viewing them.  Let me know what you think...

 I received several beautiful crocheted flowers from Dorcas, as a win in a blog hop. I decided to try my hand at these even though I have never crocheted with anything this thin.  I plan to attach them to cards with a brad, or insert a bead / button in the middle and glue on a card.
My next creative endeavor is hat pins. We had a bead exchange at our stamp club. It was so interesting to see the variety of beads that members brought. Arranging them was like Pick-up-Sticks!! 
I would be glad to swap them with my blogging friends...let me know what you would like to trade for them.

Monday, July 25, 2011

Wedding Wishes

I think that my mojo is back...Just had to go shopping for some new paper to inspire me! This card was made for special friends for their wedding last weekend. When I saw the digital stamp, from the Crafty Pad, I knew that I had to use it for this card. Having a sketch in mind also helped me plan the card.
 I found this on a website featuring verses for handmade cards. Sorry, I don't remember which one. (I googled wedding card verses.)
 I also found this circle sentiment in my digital folder. It was framed with Just Rite stamps and a Spellbinder die. I often forget about decorating the inside of cards but this extra touch made this card just perfect. Since I did not have to mail it, I presented it in a clear envelope. It will surely attract the attention of the wedding couple!! ( As well as the money inside:-)
Materials used:
DP: Glitz it Now (AC Moore)
Digital Stamp: The Crafty Pad
Inside stamps: Just Rite Stamps
Spellbinders: #5die
Ink: CTMH
Ribbon: AC Moore
Vintage charm from a once loved necklace.


I hoped that you enjoyed visiting my blog. Please feel free to comment and/or follow this blog. I hope that I have inspired you in some small way so that you feel comfortable to create your own art.

I am entering this card into the following challenges:
cupcake craft challenges Shabby Sparkle
make it monday : anything Goes
nettiegs dandy digital gems: 1 solid colored paper, 2 DP, 3 embellishments
vo stamps: Bling
catered crop: Glitter, Charm, Ribbon, Die cut (inside card)


Tuesday, July 5, 2011

Happy Birthday DH

I made this CAS card for my DH birthday today.
 He is my card critic as well as my encourager :)

This is the inside of the card.

A very simple card. I let the design and image speak for themself.
Recipe:
Image: Free digital image
DP: From my collection of unused treasures
Buttons: vintage
Twine: Baker's Twine
Colored: With Copic Markers

I hope you enjoyed viewing this CAS card. Please feel free to leave a comment and/or follow this blog.

I am entering this card into the following challenges:
paper take weekly: Anything Goes-Optional: buttons
shopping our stash: Many suggestions...I received the Baker's Twine from an online friend
kaboodle doodles: Celebrations: Birthday

Flip Flops

Another creative project that I decided to tackle was to embellish Flip Flops. I made the first two pairs for my granddaughter's teacher and her aide. Thought they could be part of an end of the year gift.

I have to apologize for the picture quality. I had to hurry to take the pictures so they could be wrapped and on their way. The teachers wore them all day so I presume that they liked them :) The bows are detachable too. I am entering them into the following challenges:
Really Reasonable Ribbon: Summer Fun
a spoon full of sugar challenge: Sewing
bearly mine-challenges: Anything Goes
scrap-creations: Summer
paper take weekly : Anything Goes...optional: Use a button
craft your passion challenges: Anything Goes
dream valley challenges: Ribbon

Friday, May 13, 2011

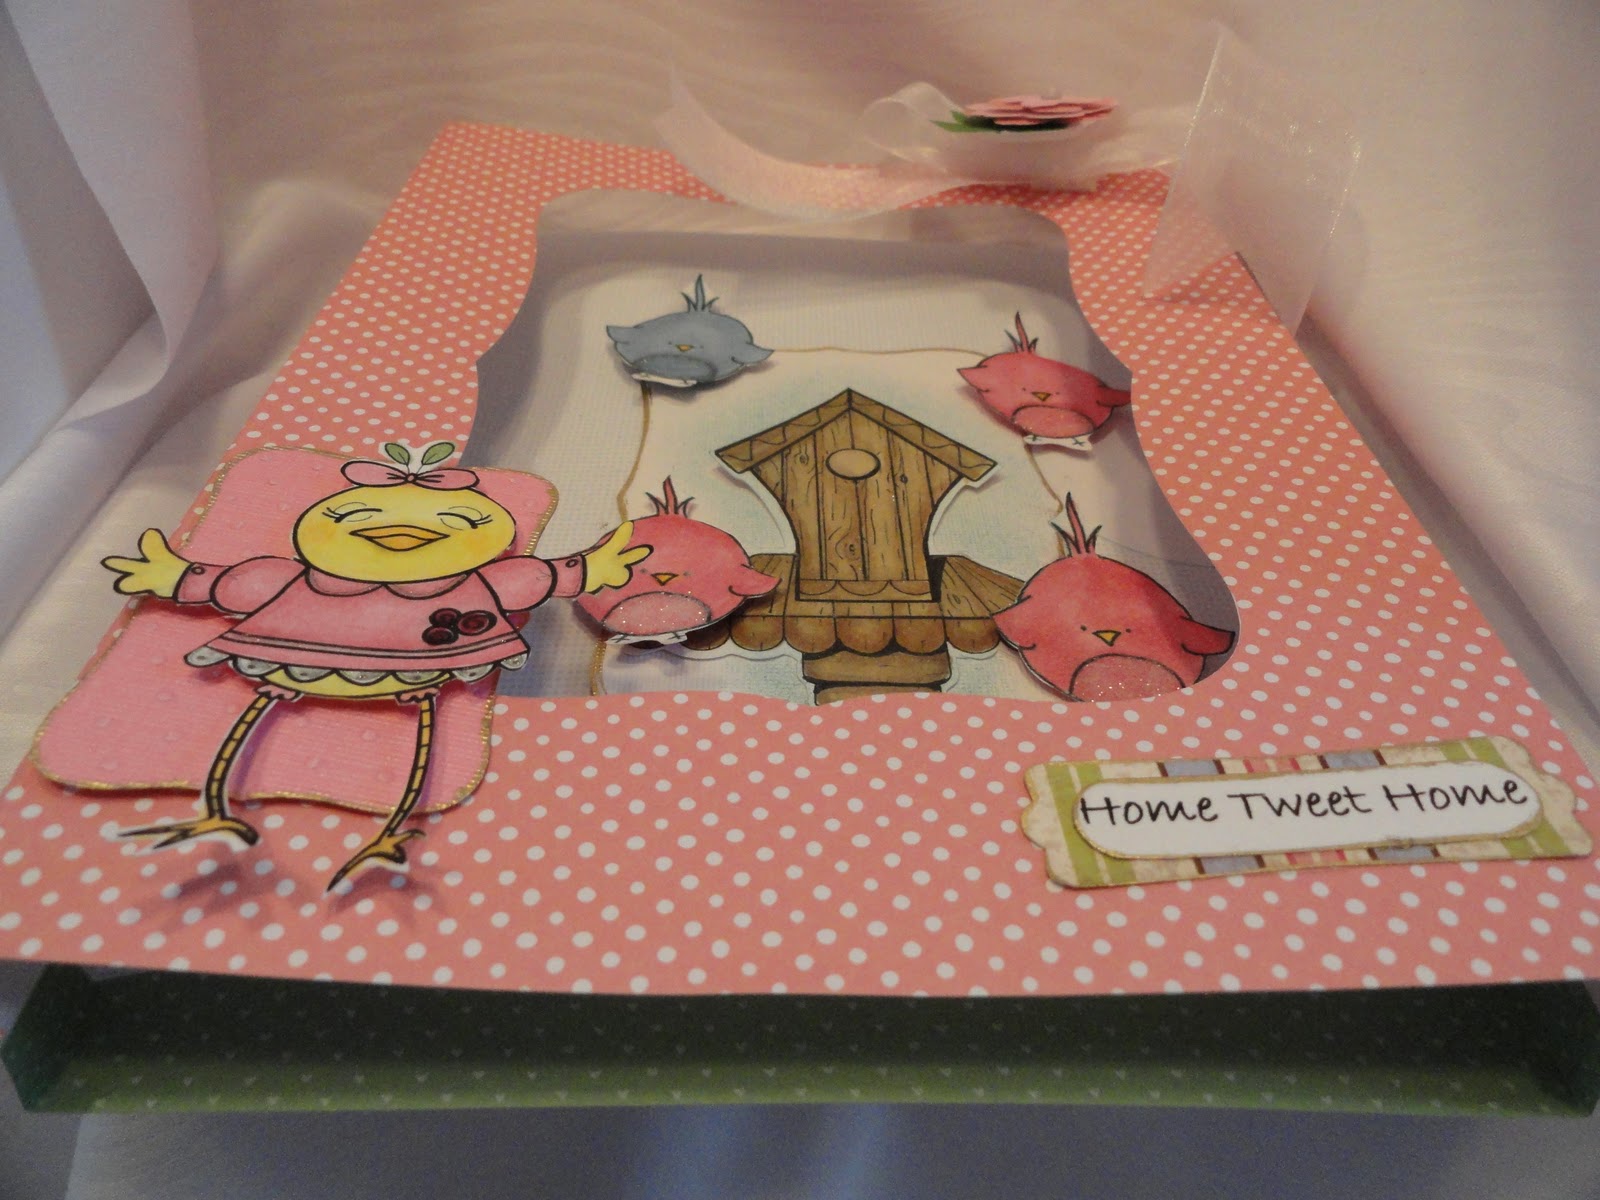
Barbara: Home Tweet Home

A friend recently purchased a new home. She is so excited to start a new chapter in her life with her four children in their new home. A surprise housewarming/birthday party was held. This is the card that I made for this special occasion. The three pink birdies represent her girls and of course the blue birdie is for her son. Mom is the mama bird on the front of the frame Proudly introducing her young ins!! I made this frame card larger that usual so that she could display it, if she desired.


The front of the card as well as the background for the birdhouse and the Mama bird was cut using a Spellbinder Labels die. All of the images are free digi stamps. The pink background for the Mama bird was embossed using a cuttlebug folder. All the birdies and Mama were popped up for dimension.

Recipe:
DP, Ribbon, Flower: Michael's
Sentiment: Computer Generated
Punches for sentiment and sentiment background: Stampin Up
Colored and shaded with Copic Markers
Bling: Gell Roll pen

I hope that you enjoyed viewing my blog and are inspired to try a frame card. It truly is very easy to make. Please feel free to leave a comment and/or follow this blog.

I am entering this card into the following challenges:
abc-challenge: Underneath
pennys challenges: Anything Goes
the paper variety: Movie Related (The Birds!!)
yns challenges: Pop it Up
my mums craft shop challenges: To Die For (Use Dies)
4 crafty chicks: Spring Inspired
art impressions stamps: Decorate the inside of the card
some odd girl: Shaped card


Monday, April 25, 2011

Butterfly Wishes

Welcome to another challenge at Craft Your Passion Challenge Blog This is my fourth and final post for this challenge blog as their GDT member. It has been fun. I love their challenges and the wonderful images that I was given to work with. The challenge this week is "Show Us Your Layers." I love the look of layering on cards. I think it makes for a finished product. Here is my entry:

As you can see, I just couldn't stop with a card but crafted a bookmark too!  I used a crimper for the gold CS and a cuttlebug embossing folder for the checked DP. I have to say that most of this project was made from my FDPS (Forgotten DP Stash.) I ran the digital stamp off on Checked DP then put this paper into the Cuttlebug folder to emboss. Once it was embossed, it was cut to the desired size and the corners were rounded using a corner rounder.  You can find a tutorial for this technique on Splitcoast Stampers.The little fence is a new Martha Stewart punch. The circle sentiment says "Happy Mother's Day." A little bling was added to the middle of this circle on the card and bookmark. On the bookmark, the ribbon was attached between the gold and black CS and between two circle sentiments. Notice the brads wrapped with baker's twine at the bottom of the bookmark. This also was a new purchase of mine:) This project has a lot of layers and embellishments but it really is a simple project to do.

Recipe:
CS and DP from my stash
Image: CoCoDingo's image
Sentiment: Free digi stamp
Ribbon: Michael's
Other product used:
Paper crimper
Martha Stewart fence punch and scalloped circle punch
Brads-CTMH
Twine: Baker's twine
Bling

I hope that you are inspired to make a card with layers. It is a great way to use some of those precious DP scraps. When you have completed your card and/or project you can click  HERE  to enter. Thanks for stopping to view my latest project. Please feel free to leave a comment and/or follow this blog.
Happy Spring!!

Butterfly Wishes...

I am entering this project into the following challenges:
tuesday throw down: Polka Dots
ambers crafts and stuff: Ribbons and Bows
flutterby wednesdays: Use a butterfly
crazy challenge:  Use three different papers
hippity with ippity: Spring/summer
make it monday: Anything Goes
the shabby tea room:  Butterfly Wishes!!
alys sunday challenge:  Use Baker's Twine (Used on the bottom of the bookmark)
catered crop:  Spring, digital butterfly, twine, brads
creative cowgirls challenge:  Spring/Mother's Day


Thursday, April 21, 2011

Easter Mini Scrapbook

While browsing at Michael's, I spotted these white cardboard eggs and they just called out "Mini Scrapbook to me:)  I have been wanting to make a unique mini book and these were perfect for a darling little girl's first Easter. My friend, Liz and I had a great time discussing how to complete this project. I was pleased how it turned out. Can't wait to add the pictures that her parents will take during this upcoming weekend. I have included a few of the decorated pages. Depending on the pictures, I plan on leaving a few pages blank for her mom to journal. I think I can include 8-10 cropped pictures in this scrapbook.
Some of the decorations on the eggs look a little crooked but it was the was just the photo!!


 This is the last page and it will be for journaling.
Recipe:
DP: Some were from my stash and my friend, Liz chose some from her pastel stash to complete this project.
Stickers: Michael's... Alphabet stickers: The Dollar Tree
Images: I wish I could give all the artist credit but they were not signed and I downloaded them before I started putting the site or artist's name with the download.
Ribbon: Michael's
Notebook Rings: Office Max
Small Eggs: Spellbinders Nestabilities
Modge Podge was used to adhere the DP to the cardboark eggs

I hope you have enjoyed viewing my first mini scrapbook. Perhaps I have inspired you to craft one of your own. Splitcoast Stampers have so many ideas to choose from.
Please feel free to leave a comment and/or follow this blog.
Happy Easter 

I am entering this project into the following challenges:
card cupids: Pastels
2 sisters challenge blog: Ribbon, Pearls, Flowers
crazy 4 challenges: Create an Easter Gift
ellephantastic challenges: Anything but a square or rectangle
our creative corner: 3D Easter Project
bearly mine-challenges: Inside Out: decorate the inside of the project too.
top tip tuesday: Open Challenge


Some Bunny Loves You

This image was given to me by Lauretta @ Craft Your Passion Challenge Blog as I am a GDT member this month. I have used this image earlier in the month to craft an Easter Treat Bag and just wanted to use it again to make an Easter Card for my husband's aunt who turned 85 today. She loves receiving my handmade cards and I love making them for her. This is a versatile image that wouldn't have to be just Easter but any spring time occasion. I am trying to use my forgotten paper treasures (stash) because I have such an accumulation of beautiful DP. I just ordered some Baker's Twine and am loving it too. I am a great fan of paper piecing, as you can tell!!

Recipe:
Image: Lauretta
DP: FPT (Forgotten Paper Treasures)
Colored: Copic Markers
Twine: Baker's Pink and white twine.
Buttons: Vintage
Distressing: CTMH ink
Card Base: Michael's

I hope that you enjoyed viewing my card and that I have inspired you to use a technique new to you. Please feel free to comment and/or follow this blog.

I am entering this card into the following challenges:
alys sunday challenge: Use Baker's Twine
creative inspirations challenge: Easter
scrap-creations1: Use a digital image
tuesday throw down: polka dots
incy wincy designs: Bright and Bold
a spoon full of sugar challenge: Let's Celebrate-Easter
ladybugs crafts ink challenge blog.: Anything Goes
sweet stamps blog: Use a Frame
kaboodle doodles: thoughts of Spring/Easter